If you’ve ever felt your backpack is missing that personal touch or simply want to cover a tear, sewing on a patch could be the perfect solution. Not only does it allow for customization, reflecting your personality and interests, but it also protects and enhances your gear’s longevity. This step-by-step guide will walk you through the simple process of attaching patches, whether decorative or functional, ensuring your backpack stands out while remaining durable. Whether you’re an outdoor enthusiast looking to add flair or a student aiming to cover up fraying spots, learning how to sew a patch is an invaluable skill that can transform your pack. So, roll up your sleeves and let’s get started on this crafty adventure!
Choosing the Right Patch for Your Backpack
When it comes to personalizing your backpack, the choice of patch can make all the difference. Whether you’re an outdoor enthusiast, a student, or just someone wanting to express their style, the right patch can reflect your personality and interests. From classic designs featuring logos of your favorite brands to intricate embroidered patches showcasing your hobbies, the selection is vast. It’s essential to consider not just aesthetics, but also the durability of the patches, especially if your backpack will face rugged outdoor conditions.
Before diving into the patch selection process, think about the material and size that will best fit your backpack’s fabric. Patches made from heavy-duty materials like twill or canvas tend to hold up well against wear and tear, making them ideal for backpacks used in more demanding environments. For backpackers, adventure patches that represent different trails or locations can be a great way to commemorate your travels while reinforcing the fabric.
Moreover, patch style plays a significant role in achieving a cohesive look. For instance, if your backpack is already decorated with various patterns, consider opting for a patch that complements rather than clashes with existing designs. Conversely, if you prefer a more minimalist approach, a single, bold patch can serve as a standout feature. Make sure to check the patch attachment method; some patches are designed to be sewn on while others might come with adhesive backs. Choose patches that align with how you intend to apply them, ensuring that they will remain securely attached during your adventures.
In summary, selecting the right patch is about merging personal expression with practical considerations, resulting in a functional yet stylish upgrade to your backpack. By carefully choosing patches that reflect your individuality and meet your durability needs, you’ll effectively enhance both the appearance and the longevity of your gear.
Essential Tools and Materials for Sewing Patches
To effectively sew patches onto your backpack, having the right tools and materials is crucial for achieving a durable and aesthetically pleasing result. A well-equipped toolkit not only simplifies the sewing process but also ensures that your patches withstand the rigors of outdoor use, whether you’re hiking in the wild or commuting to school.
Start with the basics: you’ll need a sharp pair of fabric scissors to cut your patches and threads to the desired lengths. Strong, coated threads-like polyester or nylon-offer excellent durability and resistance to fraying, which is essential for outdoor gear. A needle suited for the fabric of your backpack is also necessary; for thicker materials, a heavy-duty or denim needle will prevent bending or breaking during use.
Essential Tools List
- Fabric Scissors: For clean, precise cuts.
- Needles: Size 90/14 or heavier for thick materials.
- Thread: Polyester or nylon, preferably matching the patch color.
- Pin Cushion or Clips: To securely hold the patch in place while sewing.
- Measuring Tape: For precise placement and sizing.
- Iron: To flatten the patch or remove wrinkles before sewing.
- Sewing Machine (optional): For quicker and more consistent stitching.
In addition to the tools, consider the material for the patches. Whether you opt for fabric or embroidered patches, ensure they are made from durable materials. Wool felt or canvas patches are particularly resilient and can withstand various weather conditions. If you choose to go for iron-on patches, make sure you have an iron and a pressing cloth to avoid direct heat damage. Ultimately, equipping yourself with these essential tools and materials sets the foundation for a successful and enjoyable sewing experience, enabling you to personalize your backpack while enhancing its functionality.
Preparing Your Backpack: Important Steps Before Sewing
Before diving into the process of adding patches to your backpack, it’s crucial to ensure that your backpack is ready for the task. Taking the time to prepare your backpack correctly will not only simplify your sewing experience but also guarantee that the patches adhere securely and look great.
Start by cleaning the area where you intend to sew the patch. Dirt, dust, and remnants from previous patches can interfere with the sewing and adhesive processes. Use a damp cloth to wipe down the fabric and allow it to dry completely. If your backpack has any stubborn stains, consider spot cleaning with mild soap before moving forward. This ensures that the fabric remains in good condition and enhances the finished look of your patched backpack.
Next, lay your backpack on a flat surface, ideally with a cutting mat or a thick towel underneath to protect it from scratches and punctures. Flatten the area where you plan to attach the patch, making sure there are no creases or wrinkles. If necessary, a quick press with an iron can help smooth out the fabric. Use a measuring tape to find the ideal position for your patch-whether you want it centered, off to one side, or vertically oriented. You might find it helpful to mark the spot lightly with tailor’s chalk or fabric markers, especially for larger patches, to ensure accuracy before you start sewing.
Lastly, double-check that you have all your tools organized-this includes your needles, thread, scissors, and any stabilizers or backing material if applicable. Having everything within reach will streamline your process and reduce the likelihood of interruptions once you begin sewing. With your backpack clean and positioned correctly, and all materials at hand, you’re ready to start enhancing your gear with unique patches that reflect your personal style.
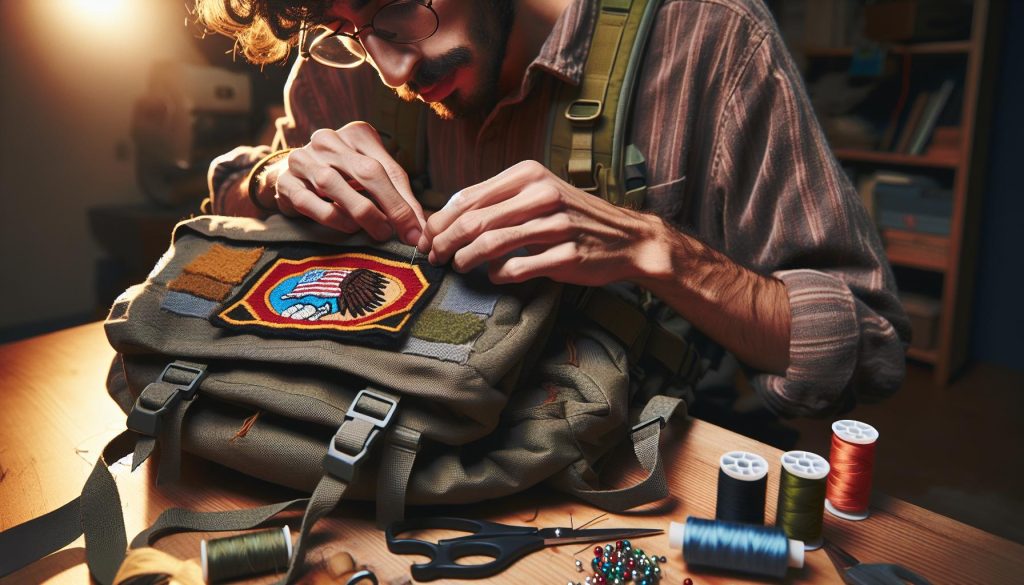
Step-by-Step Guide: How to Sew Your Patch
To achieve a professional-looking patch application on your backpack, it’s essential to follow a structured approach. Start by selecting the right thread color that matches your patch or backpack; this will create a cohesive look. Once you have everything ready, begin the sewing process with these straightforward steps.
First, thread your needle and secure the end with a knot to prevent it from slipping through the fabric. Position your patch on the marked area of your backpack, ensuring it’s aligned as desired. Using a straight stitch or a zigzag stitch, start sewing along the edges of the patch, making small stitches for a tighter hold. Keep the tension even to avoid puckering. As you sew, take care to hold the patch firmly in place, using pins or fabric clips if necessary to keep it from shifting.
When you reach a corner, make sure to pivot the patch by bringing the needle up, lifting the presser foot, and rotating the patch slightly before continuing to sew. This technique will keep the edges crisp and neat. After you’ve sewn around the entire perimeter, finish by tying off your thread securely at the back, ensuring no loose ends remain.
In addition to the basic stitching technique, consider using reinforcing stitches at critical stress points, particularly if the patch is large or if the backpack will be subject to frequent wear and tear. This extra step can significantly enhance the durability of your patches, keeping them securely attached through adventures and daily use. By crafting with intention and attention to detail, you’ll ensure your patches not only look great but stand the test of time.
Tips for Achieving a Neat and Secure Stitch
Achieving a neat and secure stitch while sewing patches on your backpack can significantly impact the patch’s durability and appearance. One critical factor to keep in mind is the type of thread and needle you’re using. Opt for a strong, durable thread such as polyester, which withstands wear better than cotton. Additionally, choose a needle suitable for the fabric of your backpack-heavy-duty needles work well for thick materials, while a finer needle may suffice for lighter fabrics. Proper preparation sets the foundation for a professional finish.
When you begin stitching, maintain consistent tension on the thread. Uneven tension can cause puckering, which detracts from the overall look of your patch. To achieve smooth, clean stitches, try the following techniques:
- Start with small stitches: Making tiny, even stitches not only secures the patch better but also enhances its visual appeal.
- Use backstitching: This technique involves sewing backward a few stitches after you’ve stitched forward, ensuring your thread doesn’t come loose.
- Practice corner turns: When approaching corners, pivot your patch by lifting the needle while the fabric is still under the presser foot. This keeps the edges sharp and clean.
Always secure the final stitch with an extra knot at the back to prevent unraveling. Consider adding reinforcing stitches at high-stress areas, especially if the backpack will undergo heavy use. These extra stitches help to reinforce the attachment and prolong the life of your patch, making it less susceptible to wear.
By focusing on these techniques, not only will your stitched patches appear polished and intentional, but they will also be equipped to endure all the adventures that come your way. Embrace the journey of sewing with confidence-it’s a skill that only gets better with practice.
Creative Ideas for Patch Placement on Backpacks
When it comes to personalizing your backpack, the placement of patches can significantly enhance its style and character. Creative patch placement not only allows for self-expression but also can make your pack more functional. For instance, patches can cover up unsightly stains or tears, transforming a damaged area into a focal point of artistic flair. Whether you’re an outdoor enthusiast or a student, experimenting with different placements offers a chance to showcase your individuality.
A popular strategy is to position patches in a way that reflects your interests and experiences. For example, if you’re into travel, consider placing patches that represent various countries or states you’ve visited in a cluster, creating a vibrant travelogue right on your backpack. Alternatively, for a more minimalist design, choose one or two larger patches and center them on the flap or front pocket to create a bold statement.
Layering and Overlapping
Don’t shy away from layering or overlapping patches. This technique can give your backpack a more dynamic, textured look. Consider using smaller patches around a larger, central patch to create a visually appealing vignette. For practicality, place patches on areas that will receive less wear and tear-like the sides or back of the pack-if your main focus is artistic expression rather than durability.
Functional Considerations
Remember to also think about functionality while deciding on placement. Patches can add grips to zippers or pockets, making them easier to open and close. Additionally, placing patches on high-wear areas, like corners or straps, can reinforce these points. Choose materials wisely; durable, heavy-duty patches can withstand more stress and contribute to the longevity of your backpack.
Incorporating these ideas into your patch placement strategy won’t just enhance your backpack’s aesthetic, but it will also create a unique piece that tells your story. Your backpack isn’t just a carrier of items; it’s an extension of you, and the patches you choose to display serve as a canvas for your adventures, interests, and personality.
How to Repair Damage While Adding Patches
Adding patches to your backpack can be a creative way to express yourself, but it’s essential to address any damage the backpack may have before you start sewing. Patches not only serve as decorations but can also act as a reliable solution for repairing small tears, holes, or frayed areas. Properly repairing damage while attaching your patches can prolong the life of your backpack and ensure that it remains functional.
First, inspect the area you plan to patch. For holes or tears, it’s crucial to trim any loose threads and clean the area to avoid future fraying. If there’s significant damage, consider reinforcing it from the inside. Use a piece of fabric or a patch that’s slightly larger than the hole, and sew or glue it in place to create a sturdy base for your patch. This will prevent the fabric from pulling more and potentially creating larger tears later on.
Preparing the Area
Once you’ve reinforced any damaged spots, you can lay your patch over the area. To ensure that the patch adheres properly and covers the damage effectively, you might want to use fabric adhesive if you’re not sewing directly or to secure the patch temporarily while you sew. Use pins or a fabric clip to hold the patch in place. This additional step ensures that any movement during sewing doesn’t misalign the patch.
Final Steps
After placing the patch, sew carefully around its edges, securing it to the backpack fabric. If the patch is large, consider adding a few extra stitches in a crisscross pattern for added durability. This not only reinforces the patch but also gives it a more finished look. Finally, trim any excess fabric from around the patch if applicable, and check the surrounding area for any remaining loose threads or signs of wear that may need attention.
By combining the functional aspect of repairing damage with the aesthetic appeal of patches, you can turn a worn backpack into a personalized piece while ensuring it remains durable for future adventures.
Customizing Your Patch: Iron-On vs. Sewn Patches
When it comes to customizing patches for your backpack, the choice between iron-on and sewn patches can significantly influence not only the aesthetics but also the longevity and durability of your patch application. Iron-on patches appeal to many due to their convenience and ease of use. They typically come with a heat-activated adhesive that bonds to the fabric when exposed to high temperatures, which means no sewing skills are required. This quick method is perfect for those looking to personalize their backpacks without investing too much time or effort. However, there’s a caveat-iron-on patches can peel or lift over time, especially in areas of heavy wear or exposure to water.
On the other hand, sewn patches offer a more permanent solution that often stands the test of time. Securing a patch with a needle and thread not only ensures that it remains firmly attached but also allows for more intricate designs that might not be feasible with an iron-on type. With sewing, you can also choose thread colors that complement or contrast creatively with your patch, enhancing overall visual appeal.
For those who value durability, sewing is the clear winner, but it may require a bit more patience and skill. If you’re a beginner, don’t hesitate to practice on scrap fabric to gain confidence before tackling your finished backpack. Remember, your choice may also depend on the patch’s intended purpose-if it’s to cover a significant damage area, sewing may offer the support needed to withstand wear and tear.
Ultimately, the decision boils down to your personal preferences and how you plan to use your backpack. If you think your style might change or you might want to remove the patch later, iron-on patches are convenient. However, if you are looking for lasting impact and durability, sewn patches are the way to go. Embrace the opportunity to express your individuality while ensuring that your backpack remains as functional and stylish as ever.
Maintaining Your Backpack After Adding Patches
Maintaining a backpack adorned with patches not only enhances its style but also involves some care to ensure longevity and functionality. Just as you would perform regular maintenance on other outdoor gear, treating your patched backpack with attention can help it withstand everyday wear and tear.
First and foremost, keep your backpack clean and dry. Regularly checking for dirt, grime, or moisture build-up is crucial as it can affect both the fabric and the patches. When washing your backpack, consider using a damp cloth to spot clean areas around the patches instead of submerging the entire bag, which could potentially lead to the lifting of iron-on patches. If you must wash it, follow the manufacturer’s instructions, ensuring that any sewn patches remain intact and functional.
Inspect and Repair
Frequent inspections of your patches and the area around them can help you catch any issues early. Look for signs of fraying threads or peeling edges. Addressing these problems promptly may simply require a few additional stitches or a small dab of fabric glue to secure loose edges. This kind of proactive care not only keeps your patches looking fresh but also prevents larger repair needs down the line.
Proper Storage
When not in use, store your backpack in a cool, dry place, avoiding areas where it could be crushed or packed tightly away with heavy items. This will help maintain its shape and prevent the patches from getting damaged. For added protection, consider using a breathable cloth bag that will keep dust away without trapping moisture.
In summary, maintaining your patched backpack involves cleaning, regular inspections, and careful storage to keep it looking good and performing well. By following these simple guidelines, you can ensure that both your backpack and its personalized patches remain stylish and durable for all your adventures.
Troubleshooting Common Sewing Problems
When sewing a patch onto your backpack, encountering common challenges can be frustrating, especially for those new to the craft. A few issues-like uneven stitches, fabric puckering, or a patch that won’t stay put-can disrupt your progress and deter you from completing your project. By identifying these problems early and applying simple solutions, you can ensure a neat and durable finish.
One frequent issue is misaligned stitches, which can make your patch look sloppy. To prevent this, always take the time to pin your patch securely in place before you start sewing. Use a few pins around the perimeter to hold it steady, and consider using a fabric marking pen to outline the edges of the patch on the backpack. This creates a clear sewing guide you can follow. If you notice puckering while sewing, it may be due to pulling the fabric too tightly. To resolve this, try loosening the tension on your sewing machine and maintain an even pace while you stitch. If you’re hand-sewing, ensure a relaxed grip on the fabric.
Another common frustration is dealing with patches that start to peel or fray at the edges. If you’re using an iron-on patch, make sure you are following the manufacturer’s instructions carefully. The temperature should be set appropriately for the fabric type, and the patch should be pressed down firmly for the recommended time. For added durability, consider running a straight stitch along the edges of the patch after it has been adhered. This not only reinforces its hold but also gives a polished finish. If you notice fraying, a quick dab of fabric glue can keep loose threads secured.
If you encounter wonky stitches or broken threads, check your needle to ensure it’s the right type and size for your fabric. A needle that’s too heavy might damage the material, leading to issues like skipped stitches. Additionally, using a thread that is appropriate for the weight of your fabric can also prevent breakage. Regularly changing your needle, especially if sewing through thick materials, can also save you a lot of headaches down the line. By being prepared for these common sewing problems and applying these practical solutions, you can enjoy the rewarding process of customizing your backpack.
Alternative Methods for Attaching Patches
When it comes to attaching patches to your backpack, sewing isn’t the only method available. A variety of alternative techniques can provide effective and visually appealing results, depending on your needs, materials, and desired aesthetics. Exploring these options not only enhances the longevity of your patches but also allows for a more personal touch to your gear.
Among the simplest methods is using fabric glue. This option is especially friendly for those who might lack sewing skills or equipment. Fabric glue provides a stronghold and is easy to apply-just coat the back of the patch, press it firmly onto the backpack, and allow it to set according to the manufacturer’s instructions. For added security, especially if the backpack will undergo heavy use, consider combining fabric glue with a few stitches around the patch’s edge. This method gives you both the convenience of glue and the durability of sewing.
Another innovative approach is iron-on patches. While these are often marketed as an easier alternative to sewing, they still require careful application. The process involves placing the patch on the designated area, covering it with a cloth, and applying heat with an iron for a specified amount of time. This method is quick and efficient, making it popular among patch enthusiasts. However, for patches on high-movement areas or those exposed to lots of friction, a few hand stitches around the perimeter can prevent peeling or fraying over time.
For those looking to make a temporary statement, the use of safety pins or Velcro can be quite effective. Safety pins allow for easy changes of patches, making it simple to rotate designs as styles or seasons change. Velcro is another versatile option; by sewing a piece onto your backpack and adhering the corresponding patch piece, you can quickly swap patches without damage to the fabric. This method combines flexibility with a secure hold, making it ideal for adventurous spirits who like to mix things up.
Ultimately, the choice of attaching methods can depend on factors like the type of patch, the backpack’s material, and your personal preferences. No matter which route you choose, these alternative methods not only simplify the process but also encourage creativity and personalization in your outdoor gear.
Showcasing Your Style: Patch Trends and Inspirations
Incorporating patches onto your backpack transcends mere functionality-it’s an expressive art form that showcases individuality and personal style. The trends in patches have evolved dramatically, reflecting cultural shifts and embracing personal narratives. From vintage band memorabilia to contemporary graphic designs, patches enable you to narrate your story visually. Whether you’re aiming for a rustic, bohemian aesthetic or a sleek, modern vibe, patches can serve as the perfect accessory to enhance your backpack’s character.
Popular Trends in Patches
The current patch trend leans heavily towards sustainability and personalization. Eco-friendly materials, such as organic cotton and recycled fabrics, are replacing traditional options. Brands and independent artists alike are curating unique designs that resonate with environmental stewardship, offering vibrant patches that make a statement while supporting ethical practices. When choosing patches, consider:
- Collectible and Custom Patches: Limited edition patches from popular brands or local artists can elevate your backpack’s uniqueness.
- Textured and Embroidered Patches: These add depth and tactile interest, creating a more dynamic look.
- Movie/TV Show References: Nostalgic designs draw inspiration from pop culture, appealing to fans looking to showcase their favorite franchises.
Placement Ideas for Maximum Impact
The strategic placement of patches can significantly influence the overall aesthetic of your backpack. A thoughtful arrangement can create a ‘story’ on your backpack, effectively turning it into a canvas for self-expression. Here are some ideas:
- Asymmetric Patterns: Using an off-center layout can make your patch collection feel more modern and dynamic.
- Layering Techniques: Experiment with overlapping patches for a curated look that exudes creativity.
- Theme-Based Arrangements: Group patches by color, theme, or size to create a cohesive visual narrative.
Ultimately, the key lies in embracing the patch culture while allowing your personal style to shine through. Whether you’re a beginner or a seasoned patch enthusiast, each choice reflects your journey, interests, and aspirations, making your backpack a unique representation of you. The possibilities are endless, so let your creativity flow and transform your backpack into a showcase of style that stands out in any crowd.
FAQ
Q: How do I choose the best thread for sewing a patch on my backpack?
A: Choose a thread made of durable material like polyester or nylon to withstand wear and tear. Match the thread color to your patch or backpack for a seamless look. For extra strength, opt for heavier threads specifically designed for upholstery or outdoor gear.
Q: What needle should I use for sewing patches on fabric?
A: Use a sharp, heavy-duty needle for sewing patches on backpacks. A needle size between 10-12 will work well, as it can easily penetrate thick fabrics. Ensure the needle is suitable for the type of fabric your backpack is made of to prevent damage.
Q: Can I use fabric glue instead of sewing to attach a patch?
A: Yes, fabric glue is a viable option for attaching patches, especially for those who prefer not to sew. Ensure you use a high-quality, washable fabric glue. However, sewing is recommended for durability, especially on gear subjected to frequent movement or stress.
Q: How can I prevent my patch from fraying over time?
A: To prevent fraying, use a zigzag stitch or overlock stitch around the edges of the patch. Additionally, applying fabric sealant can help protect raw edges. Regularly check the patch and re-sew or reinforce as needed to maintain its appearance.
Q: What is the best way to position a patch before sewing it on?
A: Position the patch on your backpack without securing it first to find the perfect spot. Use fabric pins or a bit of fabric glue to hold it temporarily. Step back and visually assess for balance and alignment before finalizing its position for sewing.
Q: How do I fix a patch that has started to come off?
A: To fix a patch that’s coming off, remove any old stitches or adhesive. Clean the area, then re-position the patch carefully. Sew it back on securely using a tight stitch, or consider applying fabric glue to reinforce it, especially around the edges.
Q: What are some creative ideas for patch designs on backpacks?
A: Explore various placements like covering worn areas, clustering multiple patches for a unique look, or using large patches as focal points. Consider seasonal themes or personal interests reflected in patch designs to showcase your personality and style effectively.
Q: Is it safe to wash my backpack after adding patches?
A: Yes, but follow specific care instructions for both the backpack and the patches. Hand washing is gentler, while machine washing may require placing the backpack in a laundry bag. Always air dry to prevent damage to the patches and maintain their integrity.
Insights and Conclusions
Congratulations on learning how to sew a patch on your backpack! By personalizing your gear, you not only enhance its functionality but also showcase your unique style. Don’t wait-grab your sewing kit and start this simple yet impactful project today! If you have any questions or experiences to share, feel free to leave a comment below.
Looking to dive deeper into backpack care? Check out our guides on “The Best Ways to Clean Your Backpack” and “How to Repair Common Backpack Issues.” And if you’re interested in upgrading your outdoor gear, explore our selection of essential Swiss Army knives and pocket tools! Remember, each step you take today empowers your adventures tomorrow. Happy sewing!